Stable Diffusion Now Has The Photoshop Generative Fill Feature With ControlNet Extension Tutorial
Full tutorial link > https://www.youtube.com/watch?v=ot5GkaxHPzk


Adobe changed the game forever with Firefly Photoshop Generative Fill feature. However, Adobe subscription is extremely expensive. As of today, Stable Diffusion Automatic1111 Web UI ControlNet extension has the same generative fill feature. In this video, I will show you how you can use Mikubill ControlNet generative fill like Photoshop has for free on your PC.
How To Install ControlNet Extension Tutorial
How To Install Automatic1111 Web UI & ControlNet Extension Tutorial
Extension Repo
https://github.com/Mikubill/sd-webui-controlnet
Generative Fill Announcement
https://github.com/Mikubill/sd-webui-controlnet/discussions/1464
Our Discord server
https://bit.ly/SECoursesDiscord
If I have been of assistance to you and you would like to show your support for my work, please consider becoming a patron on 🥰
https://www.patreon.com/SECourses
Technology & Science: News, Tips, Tutorials, Tricks, Best Applications, Guides, Reviews
https://www.youtube.com/playlist?list=PL_pbwdIyffsnkay6X91BWb9rrfLATUMr3
Playlist of StableDiffusion Tutorials, Automatic1111 and Google Colab Guides, DreamBooth, Textual Inversion / Embedding, LoRA, AI Upscaling, Pix2Pix, Img2Img
https://www.youtube.com/playlist?list=PL_pbwdIyffsmclLl0O144nQRnezKlNdx3
Download ControlNet 1.1 Models
https://huggingface.co/lllyasviel/ControlNet-v1-1/tree/main
00:00:00 Introduction to Generative Fill
00:00:12 How to update ControlNet extension
00:00:24 Download ControlNet models and get ready
00:00:49 How to use Stable Diffusion Generative Fill feature with ControlNet
00:00:58 How to see quick dropdown VAE selection
00:01:12 Select your image and use generative fill
00:01:55 Comparison of original image vs ControlNet generative fill
00:02:25 How to install Stable Diffusion, Automatic1111 Web UI and ControlNet extension
So now all below Generative Fill features coming to the Stable Diffusion with more additions via ControlNet extension.
Adobe Generative Fill is a new AI-powered feature in Photoshop that allows users to quickly and easily remove objects from images, add new content, or create entirely new images from scratch. Generative Fill uses a deep learning model to analyze the context of an image and generate realistic new content that fits in seamlessly with the surrounding scene.
To use Generative Fill, simply select the object you want to remove or add content to, and then click on the "Generative Fill" button in the toolbar. Photoshop will then generate a variety of possible results, from which you can choose the one you like best.
Generative Fill is still under development, but it has already been used to create some amazing results. For example, one user used Generative Fill to remove a person from a photo and replace them with a dog. Another user used Generative Fill to add a new background to a photo, making it look like the person in the photo was standing in a different location.
Generative Fill is a powerful new tool that has the potential to revolutionize the way we create and edit images. With Generative Fill, anyone can easily remove objects from images, add new content, or create entirely new images from scratch.
Here are some of the benefits of using Adobe Generative Fill:
Quick and easy to use: Generative Fill is a very easy-to-use tool. Simply select the object you want to remove or add content to, and then click on the "Generative Fill" button in the toolbar. Photoshop will then generate a variety of possible results, from which you can choose the one you like best.
Realistic results: Generative Fill uses a deep learning model to analyze the context of an image and generate realistic new content that fits in seamlessly with the surrounding scene.
Versatile: Generative Fill can be used to remove objects, add content, or create entirely new images from scratch.
Free: Generative Fill is available for free as part of the Adobe Creative Cloud subscription.
If you're looking for a powerful and easy-to-use tool for creating and editing images, then Adobe Generative Fill is a great option. With Generative Fill, you can quickly and easily remove objects, add content, or create entirely new images from scratch.
Here are some examples of how Adobe Generative Fill can be used:
Remove objects: Generative Fill can be used to remove unwanted objects from images. For example, you could use Generative Fill to remove a person from a photo, or to remove a background from an image.
Add content: Generative Fill can also be used to add new content to images. For example, you could use Generative Fill to add a new background to an image, or to add a new object to an image.
Create new images: Generative Fill can also be used to create entirely new images from scratch. For example, you could use Generative Fill to create a new landscape image, or to create a new portrait image.
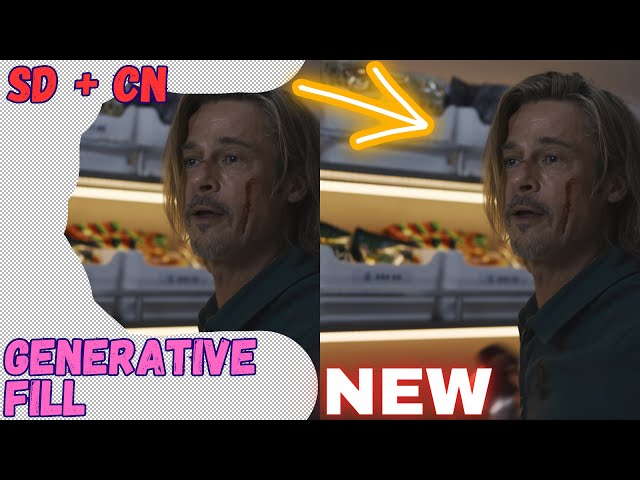
Thumbnail is from Bullet Train movie trailer.
-
00:00:00 Greetings everyone.
-
00:00:01 As you know Adobe Firefly announced the industry shocking
-
00:00:06 generative fill feature and now it has come to our most beloved extension ControlNet.
-
00:00:12 Today I will show you how to use it.
-
00:00:14 First of all update your ControlNet extension to
-
00:00:18 the latest version.
-
00:00:19 Restart your Automatic1111 web UI.
-
00:00:22 Make sure that you have downloaded the
-
00:00:24 necessary models from this link.
-
00:00:26 For this to work we need inpaint model.
-
00:00:29 Click here and download.
-
00:00:31 Put the downloaded model inside your sd-webui-controlnet models folder.
-
00:00:36 Open your Automatic1111 web UI.
-
00:00:37 I am using realistic vision version 20 for this experimentation.
-
00:00:42 You should see ControlNet version 1.1.208 here.
-
00:00:44 So this is a real image that I am going to use
-
00:00:49 as an example.
-
00:00:50 We are going to use text to image tab.
-
00:00:52 We are not using any prompting.
-
00:00:54 I am using
-
00:00:55 the best VAE file here.
-
00:00:57 If you want to see that VAE file on your screen like me go to your settings
-
00:01:02 tab.
-
00:01:03 In here you will see quick settings list.
-
00:01:04 When you click here you can see the quick settings
-
00:01:07 and select them like me.
-
00:01:08 Then restart your web UI after saving.
-
00:01:10 Okay then I will select my downloaded
-
00:01:13 image which is a real image like here.
-
00:01:16 I will mask it for example like this.
-
00:01:20 I want to do generative
-
00:01:21 fill in this part of the image.
-
00:01:24 Now it is much easier to use ControlNet with predefined selection.
-
00:01:29 Select inpaint.
-
00:01:30 You should get preprocessor inpaint here and you should get the model here.
-
00:01:34 If it doesn't see model click here and it will refresh.
-
00:01:37 Select pixel perfect.
-
00:01:39 Select enable.
-
00:01:40 Select ControlNet is more important.
-
00:01:43 Select original resolution of the image.
-
00:01:45 The image is
-
00:01:46 1280 to 1024.
-
00:01:48 Then hit generate.
-
00:01:49 You don't need anything else.
-
00:01:50 And here the ControlNet
-
00:01:53 generative fill method.
-
00:01:55 Let's compare it.
-
00:01:57 So on the left side we see the original real picture
-
00:02:00 and on the right side we see the generative fill feature of ControlNet and it is amazing.
-
00:02:06 And this is 100% free running on your computer.
-
00:02:09 You don't have to pay expensive Adobe subscription
-
00:02:13 and it is just amazing.
-
00:02:14 You can also play with other sampling methods and see how it is working.
-
00:02:18 You can also apply high resolution fix and see how it is doing.
-
00:02:22 Please make a comment and tell
-
00:02:23 me your ideas.
-
00:02:25 If you don't know how to install ControlNet extension don't worry I have excellent
-
00:02:29 tutorial for that.
-
00:02:30 Sketches into epic art with 1 click.
-
00:02:33 In this tutorial video I have explained
-
00:02:35 how to install and use ControlNet.
-
00:02:38 Moreover, in this new style transfer extension ControlNet of
-
00:02:42 Automatic1111 tutorial I have shown how to do a fresh installation of Automatic1111 web
-
00:02:48 UI
-
00:02:49 and also how to install ControlNet extension.
-
00:02:52 I will put the links of these tutorials into
-
00:02:55 the description so if you don't know how to install ControlNet don't worry just watch
-
00:03:00 these
-
00:03:01 two tutorials.
-
00:03:03 If you have enjoyed please like, subscribe, leave a comment
-
00:03:05 share.
-
00:03:06 If you support me by joining on my Youtube channel or on my Patreon I would
-
00:03:10 appreciate that very much.
-
00:03:11 On the description of the video you will find our Discord server
-
00:03:14 please join there.
-
00:03:16 I also have released amazing DeepFake tutorial video as well you may want to
-
00:03:19 check it out.
-
00:03:21 Also our discord server is keep getting bigger.
-
00:03:24 Please join and enjoy the latest
-
00:03:27 developments in the Stable Diffusion and Artificial Intelligence.
-
00:03:30 Just click join server.
-
00:03:32 Hopefully see you in another amazing tutorial.