Nano Banana Gemini 25 Flash Image Full Tutorial 27 Unique Cases vs Qwen Image Edit Free 2 Use
Nano Banana (Gemini 2.5 Flash Image) Full Tutorial - 27 Unique Cases vs Qwen Image Edit - Free 2 Use
Full tutorial link > https://www.youtube.com/watch?v=qPUreQxB8zQ


Nano Banana AI image editing model was published by Google today. It is officially named the Google Gemini 2.5 Flash Image model. It is the most advanced zero-shot image editing model ever made. I have conducted a thorough, in-depth review of this model with 27 unique cases. All prompts, images used, and results are demonstrated in real-time—live in this tutorial. Moreover, I have compared each result with the state-of-the-art (SOTA) best open-source, locally available, and free-to-use Qwen Image Edit model, so we can see which model performs better at which tasks.
Generate Stunning AI Images with Fotor x Nano Banana: https://bit.ly/41vIxVT
Free to use Nano Banana : https://aistudio.google.com/prompts/new_chat
Download all demo images and prompts : https://www.patreon.com/posts/114517862
File name is : Qwen_Edit_Demo_Images_With_Metadata_And_Prompts_v3.zip in above post
Qwen Image Edit full tutorial video : https://youtu.be/gLCMhbsICEQ
SUPIR latest tutorial video for upscaling Gemini / Nano Banana generated images into real images : https://youtu.be/OYxVEvDf284
Image comparison slider app used in tutorial : https://www.patreon.com/posts/133935178
Video Chapters
00:00:00 Introduction to Google's "Nano Banana" (Gemini 2.5 Flash)
00:00:28 Comparing Gemini vs. Qwen Image Edit Model (27 Test Cases)
00:01:33 Solving Gemini's Low Resolution with SUPIR Upscaling
00:02:28 Teaser: Upcoming Qwen Image LoRA Training Application
00:02:41 How to Access Gemini 2.5 Flash in Google AI Studio
00:02:55 Test Case 1: Text Conversion
00:03:31 Test Case 2: Photorealism Test (Portrait)
00:04:36 Test Case 3: Adding Sunglasses
00:05:44 Test Case 4: Adding Iron Man to a Surfer (Gemini Wins)
00:06:38 Test Case 5: Adding a Cat (Qwen Wins)
00:07:20 Test Case 6: Clothing Extraction (Gemini Fails)
00:08:02 Test Case 7: Character Back View (Qwen Wins on Accuracy)
00:09:24 Test Case 8: Photo to Anime Style (Gemini Wins on Resemblance)
00:10:18 Test Case 9: Changing Background to Night
00:11:37 Test Case 10: Outpainting a Portrait (Qwen Wins on Proportions)
00:13:22 Test Case 11: Adding a Lion to a Scene (Gemini Wins)
00:13:59 Test Cases 12 & 13: Stylization Failures (Pixel Art & Claymation)
00:15:44 Test Case 14: Adding a Knight's Helmet
00:16:47 Test Case 15: Adding Reflections (Qwen is More Accurate)
00:18:00 Test Case 16: Changing Day to Night (Window View)
00:19:33 Test Case 17: Adding a Wooden Sign
00:20:22 Test Case 18: Old Photo Restoration
00:21:47 Test Case 19: Adding a Spaceship to a City
00:22:34 Test Case 20: Generating a Logo from an Empty Canvas
00:23:48 Test Case 21: Changing Clothing Style
00:24:49 Test Case 22: Complex Prompt Following (Gemini's Clear Win)
00:25:47 Test Case 23: Stylization Failure (Gemini Ignored Prompt)
00:26:35 Test Case 24: Cell Shading a Drawing
00:27:42 Test Case 25: 3D Sketch to Photorealistic Render
00:29:11 Test Case 26: Photo to Professional Sketch
00:30:16 Test Case 27: Multi-Image Editing (Gemini's Unique Strength)
00:31:23 How to Upscale Gemini Images with the SUPIR Application
00:32:51 Using Gemini Pro to Generate Better Prompts for Upscaling
00:33:41 Before & After: SUPIR Upscale Results
00:34:56 LLaVA vs. Gemini Prompt: Comparing Upscale Quality
00:35:26 Sneak Peek: Qwen Image LoRA Trainer (Musubi Tuner)
00:36:45 Feature: Built-in Image Captioning with Qwen 2.5 VL
00:37:22 Sneak Peek: Ultimate Image Preprocessing Application
00:38:06 Demo: Automated Dataset Cropping & Resizing Workflow
00:39:22 Final Words & How to Access Test Files
In a delightful twist of tech whimsy, Google unveiled its latest AI breakthrough on August 26, 2025: Gemini 2.5 Flash Image, affectionately codenamed "Nano Banana." This model, which sparked viral buzz under its anonymous alias on platforms like LMArena, promises to transform how we create and edit images. No more clunky software—now, natural language prompts handle everything from blending photos to maintaining character consistency.
What started as cryptic hints (think banana-themed teasers from Google execs) culminated in today's announcement. Nano Banana isn't just fun nomenclature; it's a powerhouse built on Gemini's multimodal foundation. Users can upload images, describe changes like "add glasses and change the shirt to red," and watch the AI deliver precise edits without distorting faces or scenes. This addresses a core pain point in AI imaging: inconsistency, where rivals like OpenAI's tools often warp details during iterations.
Key features shine in creative control. Character consistency lets you reuse subjects across scenarios—e.g., placing your pet in various outfits while preserving its likeness. Multi-image fusion blends elements seamlessly, and Gemini's world knowledge enables semantic edits, like turning hand-drawn diagrams into educational visuals. On benchmarks, it tops LMArena with a 1,362 ELO score, outpacing GPT-4o and Qwen in fidelity and speed.
Some background music by NoCopyrightSounds : https://gist.github.com/FurkanGozukara/681667e5d7051b073f2e795794c46170
-
00:00:00 Greetings everyone. Google just dropped the most amazing image editing model that has
-
00:00:05 been ever made, which is known as Nano Banana, which you have been
-
00:00:10 seeing perhaps in the last week. Secretly, it is actually Gemini 2.5 Flash Image Model,
-
00:00:17 and I will show you how to use it for free inside Google Studio AI in this tutorial.
-
00:00:23 Just type Google Studio AI, go to Google Studio AI, and from here we will use.
-
00:00:28 I have compared it exactly 27 unique cases of this model with Qwen Image Edit Model.
-
00:00:37 I will show every single case live with their prompts. So this will be a fair,
-
00:00:45 raw comparison between Qwen Image Edit Model and Gemini 2.5 Flash Image Model,
-
00:00:52 as known as Nano Banana. I will show for every case, original image, the result of the Gemini
-
00:01:00 2.5 Flash Image Model, as known as Nano Banana model, and also Qwen Image Edit Model result,
-
00:01:08 as you can see. So I will also compare them with Gemini versus Qwen Image Edit Model. I will make
-
00:01:15 a fair comparison so that you will see that in some cases Gemini wins, and in some cases Qwen
-
00:01:22 Image Edit Model wins. For example, in this case, Qwen Image Edit Model is not able to
-
00:01:28 keep the consistency of the face or the realism, but the Gemini is perfectly able to keep that.
-
00:01:33 Furthermore, you will notice that while watching the tutorial, the resolution of the Gemini output
-
00:01:40 is really low. So you lose a lot of quality, but don't worry, I will show you how you can upscale
-
00:01:47 Gemini outputs and make them really amazing images like this. You see, this case has been made with
-
00:01:55 SUPIR application that we have, and we upscaled it into 4x resolution. And you see how sharp,
-
00:02:03 how detailed the Gemini output has become. So this was raw Gemini output, and this is the result of
-
00:02:10 the SUPIR upscale of the Gemini output. And if you are wondering what was the original image,
-
00:02:16 this was the original image. So we edited this image with the Gemini, with the Nano Banana,
-
00:02:22 and we added a lion to here, and we made it like this, as you can see.
-
00:02:28 Finally, I will talk about the upcoming Qwen Image Lora training application based on Musubi
-
00:02:35 Tuner. It is almost done, almost ready. So keep watching this tutorial entirely.
-
00:02:41 Go to Google Studio AI, and from here we will use. Make sure that click here and
-
00:02:47 select Gemini 2.5 Flash Image Preview model. After that, we are ready to editing images.
-
00:02:55 So let's begin with the first test. Click this plus icon, upload file. The first test
-
00:03:01 is converting this Slack message into the SECourses. So here are our prompt,
-
00:03:07 run. And the result has been generated in 10 seconds, so time to compare. So I will use my
-
00:03:12 image comparison slider. Let's drag and drop. This is the original image, and this is what
-
00:03:18 Gemini Flash generated from this to this. And let's compare with Qwen Image Edit Model. Okay,
-
00:03:25 the left one is Qwen Image Edit Model, the right one is Gemini. So this is the result.
-
00:03:31 Let's do the second case. So new chat, upload. This is a fully realism test. So let's see what
-
00:03:38 will it do. Let's add our prompt, run. And the result has been generated, let's
-
00:03:43 download it. Let's upload them. Okay, the first comparison is with Gemini. So from left image,
-
00:03:49 this is the original image, and this is the generated image. The realism of the Gemini,
-
00:03:55 as known as Nano Banana model, is just amazing, as you can see,
-
00:03:59 from this left one to the right one. But I can see that it has lost some resolution,
-
00:04:05 as you can see, from this one to this one. So it reduces the resolution, the sharpness,
-
00:04:11 the details are a little bit lost, I can say that, but the realism is next level. Let's see
-
00:04:16 with the Qwen Image Edit Model result. So the left one is Qwen Image Edit Model result, and
-
00:04:22 the right one is Gemini. The Qwen Image Edit Model result was upscaled again, so therefore it is much
-
00:04:29 more sharper. But when it comes to realism, the Gemini, the Nano Banana is much better.
-
00:04:36 So let's do the third case testing. So you can also drag and drop like this. Here are our prompt,
-
00:04:42 let's run. Okay, image generated, let's download it. Let's make a comparison.
-
00:04:47 So the first result is original versus Gemini. The Gemini did an excellent job, as again, we can see
-
00:04:54 that. However, the resolution is dropped because its output resolution is not matching the input
-
00:05:00 resolution. It downscales it into 1 megapixels. Maybe it is also further reducing, I don't know,
-
00:05:06 because the original image is not also that much higher resolution. It is 1328 to 1328,
-
00:05:12 which is the native resolution of the Qwen Image Edit Model, but this is the result. So how we
-
00:05:19 can fix this? We can fix this with upscaling the result image, which I'm going to show you. Let's
-
00:05:24 compare with the Qwen Image Edit Model result. Okay, the Qwen Image Edit Model is much more
-
00:05:30 sharper because I had used the image upscale as well. And in this example, I think they are
-
00:05:37 pretty much matching. Both of them is good. The choice is up to you. Let's continue. Okay, plus
-
00:05:44 icon. Let's drag and drop. This is another case where the realism will shine, I believe. Okay,
-
00:05:50 let's try. And the result has been generated. Let's upload the results and compare. Okay,
-
00:05:56 this is the original image and this is the Gemini generation. We can see that it did an excellent
-
00:06:03 job. Yes. This is such a good job, such a good work that it is amazing. It changed the end of
-
00:06:09 the surf, I can see that, like this, but it did an excellent job. Let's compare with the Qwen Image
-
00:06:16 Edit Model. Okay, so the left one is Qwen Image Edit Model, and the right one is the Gemini. So
-
00:06:23 we can see that the Gemini added character, Iron Man, is much more realistic and better. The only
-
00:06:31 part that it is lower resolution, however, it is much more realistic and higher quality.
-
00:06:38 Okay, here are our next case. Let's upload it and let's use our prompt,
-
00:06:43 run. And the result generated. Let's refresh. Let's do the comparison. Okay, the left one
-
00:06:50 is the original image, and the right one is the Gemini. In this case, the Gemini generation looks
-
00:06:56 extremely artificial in my opinion, as you can see. It looks like it was photoshopped. So let's
-
00:07:02 compare with the Qwen Image Edit. So the left one is Qwen Image Edit, the right one is Gemini.
-
00:07:08 We can see that Qwen Image Edit added shadows, it looks much more natural, realistic. So in
-
00:07:15 this case, I think the winner is Qwen Image Edit Model in my opinion, as you can see.
-
00:07:20 Okay, now the case six, we are going to test. And here are our prompt, let's run. All right,
-
00:07:27 this case is a total failure for the Gemini. Let's download it. Let's upload for comparison. Okay,
-
00:07:34 the left one is the original image which we want to extract the clothing,
-
00:07:38 and this is the Gemini result. I can say that it is pretty irrelevant. Let's see the result of the
-
00:07:46 Qwen Image Edit. You see, from this to this. This is an exact match. This is much better,
-
00:07:52 and Qwen Image Edit Model is free to use, open source, even commercially usable,
-
00:07:57 Apache 2 license. So in this case, Qwen Image Edit Model wins again.
-
00:08:02 Okay, let's do the next test. Okay, let's write our prompt and generate. And the generation
-
00:08:07 has been completed, let's download. Okay, let's compare it. Okay, so this is the original image
-
00:08:13 and this is the result. So it looks like, let's see, yes, pretty accurate. It looks to me pretty
-
00:08:21 accurate, pretty high quality. We can see that the resolution is dropped, but it is really good.
-
00:08:25 Let's see with the result of the Qwen Image Edit Model. Okay, this is the Qwen Image Edit Model,
-
00:08:31 and let's compare both Gemini and Qwen Image Edit Model. So the left one is Gemini, the right one is
-
00:08:37 the Qwen Image Edit Model. I would say that in this case, Qwen Image Edit Model looks,
-
00:08:45 I don't know, better. It's a choice of yours, but both of them is looking great, so it is up
-
00:08:51 to you. Let's see which one knew the side of the sword accurate. So the side of the sword looking
-
00:08:58 here at the Gemini and it is looking here at the Qwen Image Edit Model. We see the sword at the
-
00:09:04 right side from front view. At the back view, it should be at here, at the left side. Yes,
-
00:09:10 it is true for the Qwen Image Edit Model, but it is inaccurate for the, as you can see, Gemini, as
-
00:09:17 known as Nano Banana model. So we can say that the winner is, in this case, Qwen Image Edit Model.
-
00:09:24 Let's do the next test. So I will make this as "make vibrant anime". Let's see. Okay,
-
00:09:30 we got the result. Let's make a comparison. Okay, the left one is the original image,
-
00:09:35 and the right one is the result of the Gemini, as known as Nano Banana model. We can see that
-
00:09:41 it did an excellent job. It is looking really, really good, I would say. Yeah,
-
00:09:46 amazing, amazing quality. And let's see the result of the Qwen Image Edit Model.
-
00:09:51 So the Qwen Image Edit Model completely changed the face characteristic into an anime. So if you
-
00:09:59 are looking for resemblance also, I can say that the winner is Gemini, the Nano Banana
-
00:10:05 model in this case. It is not exactly as a traditional anime, it is more looking like
-
00:10:10 a cartoon model. However, its face resemblance is much more accurate than the Qwen Image Edit Model.
-
00:10:18 Okay, let's do the next test. So this is test case nine. Let's use our prompt. It looks like the
-
00:10:26 Gemini Flash Image Model, the Nano Banana model is expert at keeping the face characteristics. Okay,
-
00:10:35 we got the results, time to compare. Okay, let's upload the results. Okay, so the left one is the
-
00:10:42 original image, and the right one is the Gemini. Once again, because of the resolution drop, we see
-
00:10:49 some quality drop for sure, and the lightning changed as expected. The quality looking okay,
-
00:10:56 it is looking decent. So this to this. And let's compare it with the Qwen Image Edit Model. Okay,
-
00:11:03 this is Qwen Image Edit Model. Let's see. Yeah, the Qwen Image Edit Model also changed
-
00:11:08 the coloring as expected. And as you can see, it is keeping the proportions better with the
-
00:11:14 Qwen Image Edit Model. There is some also slight other changes. Let's compare both of
-
00:11:19 them. So the left one is the Gemini, the right one is the Qwen Image Edit Model. There is not
-
00:11:25 a clear winner in this case. The background of the Gemini looking more realistic, but the image
-
00:11:31 looking more fake. This one looking more natural than this one, as you can see. So it is up to you.
-
00:11:37 Let's do the next case. Okay, this is case 10. This is one of the cases where the Qwen
-
00:11:44 Image Edit Model did an excellent job. Let's see with the Gemini 2.5 Flash Image Preview model,
-
00:11:51 which is known as Nano Banana. Okay. All right, let's download the result. Okay,
-
00:11:56 let's upload them and full screen. So original versus Gemini. From this to this. Let's see. Yeah,
-
00:12:05 it did an excellent job. The realism of the rest of the image is looking great. The expansion is
-
00:12:11 looking really great. So this is outpainting, as you can see. It didn't change the, oh,
-
00:12:18 it slightly changed it, yes, I can see that. When we look at the eyes, I can see that it
-
00:12:23 changed the eyes. So it made some changes. Yeah, but it's pretty cool when you consider that this
-
00:12:30 is a hard task. Let's see the result of the Qwen Image Edit Model. From this to this, yes,
-
00:12:36 the Qwen Image Edit Model kept the eyes better, I can say that. It also slightly
-
00:12:42 changes some of the parts it shouldn't change, but the realism is not that great yet with Qwen
-
00:12:48 Image Edit Model. They say that they will fix it hopefully, maybe with another Lora. Let's
-
00:12:52 compare both of the results with the Gemini. So the left one is the Qwen Image Edit Model,
-
00:12:58 and the right one is the Gemini. Oh, now I can notice that the body proportions of the Gemini
-
00:13:04 result is not good. You see? It looks unnatural. The Qwen Image Edit Model looks more natural than
-
00:13:11 the Gemini itself when you look at the body proportions. So I would say that the winner
-
00:13:17 is Qwen Image Edit Model. Yes, the face is also more clear, better quality than the Gemini itself.
-
00:13:22 Okay, let's do the next test. Okay, this is where Qwen Image Edit Model failed,
-
00:13:27 unfortunately. Let's see the how Gemini will do. Okay, run. All right, yes. I can say that
-
00:13:34 the winner is Gemini in this test. Okay, this is the original image and this is the Gemini output.
-
00:13:42 I can say that it did a pretty good job. Let's see the result of the Qwen Image Edit Model.
-
00:13:48 So this is original and this is Qwen Image Edit Model result. As you can see, the face changes,
-
00:13:53 the realism is lost. So the winner is Gemini, the Nano Banana model in this case.
-
00:13:59 Okay, let's do the new chat and upload. And our next case is this one. This is where the
-
00:14:06 Qwen Image Edit Model did a good job. So I am going to also test it here. I will try this
-
00:14:12 prompt. Let's see what we are going to get. Yes, this is a failure. This is a complete failure
-
00:14:19 compared to the Qwen Image Edit Model. Okay, let's do the comparison. Full screen. So the
-
00:14:26 left one is the original image, the right one is the Qwen Image Edit Model, as you can see,
-
00:14:31 it did an excellent job for this prompt into pixel art. But the Gemini didn't turn it into an art. It
-
00:14:38 is just pixel. It is just pixelated. It is not an art. So it did convert it into pixelated,
-
00:14:45 but not a pixel art. But when we compare with Qwen Image Edit Model,
-
00:14:50 it did an excellent job. So the winner is the Qwen Image Edit Model for this case.
-
00:14:56 Let's do the new case. Let's upload our next image and let's type our prompt and let's run. Okay,
-
00:15:03 this is another case where Gemini, the Nano Banana model is failing. The authors also said that this
-
00:15:09 model is focused on realism. So I think these results are expected for stylization. Let's see
-
00:15:18 the result. Okay, let's refresh and let's upload the images and full screen. So the left one is
-
00:15:25 the original, the right one is the result of the Qwen Image Edit Model. It is an excellent result,
-
00:15:31 as you can see. When we compare with Gemini, well, it didn't do anything.
-
00:15:36 So it was not able to recreate this image in claymation figures. So it completely failed.
-
00:15:44 Okay, let's do the next case. So let's upload our image. You can both drag and drop or click
-
00:15:50 this plus icon. Let's type our prompt. I believe that it will do a good job at this one. This is
-
00:15:56 a realism prompt. Okay, I can see that it changed the face, which I didn't ask for,
-
00:16:03 but let's see. Okay, let's compare. Okay, full screen and the result. So the first result is from
-
00:16:10 the Qwen Image Edit Model. It keeps the face as it is, but it lost some realism, unfortunately. Let's
-
00:16:18 see the result of the Gemini. So the Gemini result is like that. The Gemini significantly changed the
-
00:16:26 image itself, as you can see, but the face realism is better than the Qwen Image Edit Model. The Qwen
-
00:16:33 Image Edit Model is lacking the realism. So let's compare both Gemini and the Qwen Image
-
00:16:38 Edit Model. Well, I cannot say the Gemini is the direct winner in this case. So it is up to you.
-
00:16:47 Let's see the new chat. Okay, this is one of the good cases where the Qwen Image Edit
-
00:16:53 Model did an excellent job. Let's see how the Gemini will perform. Okay, the Gemini changed
-
00:17:00 the image significantly. It didn't obey the prompt as much as the Qwen Image Model, I can
-
00:17:06 see that. Let's see. Let's compare it. Okay, the first result is from Gemini. We can see that it
-
00:17:13 changed the table. So this is not the same table, as you can see. So this is not the same table,
-
00:17:19 unfortunately. It made the reflections looks like accurate. I can see that the reflections
-
00:17:25 are also changed. That's a plus. But no, actually reflections is also changed too much. You see,
-
00:17:31 there are normally chairs here, which is blocking the table, but it changed that and it changed the
-
00:17:38 table significantly. The rest is okay, but table changed a lot. So let's see the result
-
00:17:44 of the Qwen Image Edit Model. You can see that the Qwen Image Edit Model didn't change these
-
00:17:49 parts opposed to the Gemini. Gemini is doing a lot of changes. It also kept the table as well,
-
00:17:55 as it is. So the clear winner is Qwen Image Edit Model in this case.
-
00:18:00 Let's do the new one. Okay, upload image. This was a good test case as well. Let's see how will
-
00:18:07 Gemini will do. Okay, the Gemini result is looking really good. Let's see the comparison. Okay,
-
00:18:15 so this is the original image and this is the Gemini version. Let's see how it did. Okay,
-
00:18:23 I see that it changed the lamp here and it changed some other parts of the image as well.
-
00:18:31 And I don't know, it looks like some unnatural to me. It is decent, pretty decent, but yeah,
-
00:18:40 it is like this. Let's see the result of the Qwen Image Edit Model. So from this to this, the Qwen
-
00:18:46 Image Edit Model changed entirely. The Qwen Image Edit Model also changed inside of the building,
-
00:18:51 but it is more loyal to the image itself. So let's compare both of them. So left one is Gemini,
-
00:18:58 the right one is the Qwen Image Edit Model. We can see that the Qwen Image Edit Model is much
-
00:19:04 more loyal to the image, and I don't know, it's a choice of yours. Both of them is interesting,
-
00:19:12 so I cannot say one of them is clear winner in this case because the Gemini edit looking like,
-
00:19:19 you know, unrealistic compared to the Qwen Image Edit Model,
-
00:19:22 but Qwen Image Edit Model changed the inside of the house. Actually,
-
00:19:27 since the door of the house is open, we can assume that it would happen, but it is up to you.
-
00:19:33 Okay, let's do a new chat. Okay, test 17. Let's write our prompt. Okay,
-
00:19:39 we said that "add a wooden sign" and it added this way. Let's, okay, let's do the comparison.
-
00:19:46 Full screen. So the left one is original, the right one is Gemini. From this to this. Yes,
-
00:19:52 the resolution, the sharpness of the image significantly dropped. It added a sign,
-
00:19:57 the sign looking pretty good, pretty accurate, but we lost some quality. This is decent. Let's
-
00:20:03 see the Qwen Image Edit Model. So the Qwen Image Edit Model also changed the image,
-
00:20:09 not it is as exactly as before. The added sign is like that. It's also looking pretty decent.
-
00:20:15 So I don't know if there is a clear winner or not. Both of them is looking okay. So it's up to you.
-
00:20:22 This is one of the cases where the Qwen Image Edit Model shined. It absolutely did an amazing job.
-
00:20:29 The image, the photo image restoration. Let's see what will the Gemini, the Nano Banana model will
-
00:20:35 do. Wow, it looks pretty good. Okay, let's see. So this is original versus Gemini. Let's see. Yes,
-
00:20:44 I can say that the Gemini did an excellent job in this case. Pretty good restoration. Yes,
-
00:20:52 pretty decent, pretty amazing restoration. It completely restored the image. And let's see
-
00:20:58 the result of the Qwen Image Edit Model. And this is the Qwen Image Edit Model result. We can say
-
00:21:04 that probably Gemini is better. Let's compare both of them. The resolution of Gemini is lower. Okay,
-
00:21:10 from this to this. They definitely colored it, we can see that. The color of the Gemini
-
00:21:18 is still looking like in some cases outdated, like old. The coloring of the Qwen Image Edit
-
00:21:24 Model looking good, but the Qwen Image Edit Model added some, as you can see,
-
00:21:29 turned the girl into something like a more grown person. So that is the biggest issue
-
00:21:35 with the Qwen Image Edit Model. The Gemini is better at that case, but at the restoration
-
00:21:40 level and the details, Qwen Image Edit Model is better. So I would say this depends on each case.
-
00:21:47 Okay, let's do our next case. Let's upload and let's select the image. And let's type our prompt.
-
00:21:55 Okay, and let's run. Okay, it did a pretty good job. Let's see the result. Let's download. Okay,
-
00:22:01 let's refresh. Let's upload the images and let's compare. So original versus Gemini. From this
-
00:22:08 image into this one. It is really good. Looking really good. The reflection is not very accurate,
-
00:22:13 but it is really good. Let's see the result of the Qwen Image Edit Model.
-
00:22:18 So this is the Qwen Image Edit Model. Again, the Gemini is, as we can see,
-
00:22:23 much more realistic. And yes, it is up to you, but I would say that the
-
00:22:29 Gemini is looking better for this test. So I would say that the winner is Gemini.
-
00:22:34 Let's do the next test. So this is test case 20. And this is a nice prompt that I made to generate
-
00:22:43 our new YouTube logo. So let's see how will Gemini will perform. Wow, it absolutely did an
-
00:22:51 amazing job. Let's see. Okay, okay, let's upload the comparison images. Let's full screen. So we
-
00:23:00 gave an empty canvas and we wanted to generate a logo. This is the logo that Gemini generated,
-
00:23:07 and this is the logo that the Qwen Image Edit Model generated. It depends on the purpose,
-
00:23:13 I would say. So let's compare both of them, how they are looking. So this is the Gemini
-
00:23:18 generation. It is looking amazing, and this is the Qwen Image Edit Model generation. So
-
00:23:25 it's up to you, your choice. Probably at lower, at smaller resolution, what the Qwen Image Edit
-
00:23:31 Model generated would look better, but this is also looking very cool, very amazing. So I
-
00:23:36 wouldn't say neither of them is a clear winner. It depends on the purpose, but both of them is
-
00:23:42 performing amazing. The prompt following for the Gemini is better for this case, I can say that.
-
00:23:48 Okay, let's do the next test. This is the test case 21. And I wonder how will the Gemini realism
-
00:23:57 will perform for this case. Let's run. Wow, okay, this is the result of the Gemini. Let's
-
00:24:03 refresh and do the comparison. Okay. Okay, so from this to this, the Gemini did an excellent
-
00:24:09 job. It is looking pretty good, pretty amazing. Yes, amazing. Let's see the result of the Qwen
-
00:24:16 Image Edit Model. So the left one is the Qwen Image Edit Model. This is what the Qwen Image
-
00:24:21 Edit Model made. And this is what the Gemini made. Again, the Qwen Image Edit Model lacking realism,
-
00:24:28 but since we can upscale in the Qwen Image Edit Model with latent upscale by using the SwarmUI,
-
00:24:34 as I have shown in the tutorial, it is more sharp, it has more details,
-
00:24:39 but this one is much more realistic as expected. So I would say that the winner is Gemini,
-
00:24:45 but we need to upscale, which I'm going to show you at the end of the tutorial.
-
00:24:49 Okay, let's do the case 22. I think Gemini will do this just fine. So let's copy our
-
00:24:55 prompt and run. Okay. Yes, it did a good job. Really good. The prompt following
-
00:25:02 and complexity of the understanding images of the Gemini is definitely
-
00:25:07 better. So let's make the comparison. By the way, this folder is shared on Patreon,
-
00:25:13 so you can directly download it along with the prompts that is used. The link will be in the
-
00:25:18 description of the video, as usual. Okay, let's do the comparison. So this is original image,
-
00:25:24 and this is the Gemini generation. Amazing. It really followed the prompt better. We just
-
00:25:29 need to upscale this image. And this is the result of the Qwen Image Edit Model.
-
00:25:35 We can say that the Gemini is the clear winner at this case when it comes to following the
-
00:25:42 prompt. Really amazing. I will upscale them at the end of the video, so we will see.
-
00:25:47 Let's do the new chat. And let's use the test case 23. So I'm going to use this prompt and let's see
-
00:25:54 how it will perform. Okay, in this case, the Gemini failed miserably because this was a more
-
00:26:01 like a stylization case, and it didn't follow the prompt, so it failed at this case. Okay,
-
00:26:09 let's refresh and upload the test images. Okay, full screen. The original versus Gemini. As you
-
00:26:16 can see, the Gemini didn't do almost no changes. So it failed. Let's see the result of the Qwen
-
00:26:22 Image Edit Model. The Qwen Image Edit Model perfectly worked, followed the prompt perfectly.
-
00:26:28 So this is the result comparison. The clear winner is Qwen Image Edit Model for this case.
-
00:26:35 Okay, let's continue with the next case. This is case 24. Okay, let's type our prompt and let's
-
00:26:41 see the result. The result is looking pretty good. So let's see. Okay, let's full screen.
-
00:26:47 So the original versus Gemini. So the left one is original, the right one is Gemini. It did a pretty
-
00:26:54 good coloring, but I think, I don't know if it is accurately cell shading, but it is just very good.
-
00:27:03 I mean, the colors are very good. Let's see the Qwen Image Edit Model result. So this is the Qwen
-
00:27:09 Image Edit Model result. This is again upscaled, therefore it is looking sharper and better. And
-
00:27:16 this is the Gemini result at the left right now. So Gemini versus Qwen Image Edit Model. I don't
-
00:27:23 know which one is winner, but the coloring, the different colors, the color composition of the
-
00:27:30 Gemini is better. However, I didn't provide any color scheme for the Qwen Image Edit
-
00:27:35 Model. Therefore, it did a like a single color. I think both of them is really good for this case.
-
00:27:42 Let's do the next case. Let's upload file. So this is case 25. Let's type prompt and let's see.
-
00:27:49 I believe that the Gemini will do better than the Qwen Image Edit Model for this case,
-
00:27:54 but let's see. Okay, let's download it. So original versus Gemini. Okay. Wow,
-
00:28:00 the Gemini did an excellent job for turning this 3D sketch into a real photograph or a render,
-
00:28:08 we can say, but this more looks like a real photograph and it is just amazing. It turned
-
00:28:15 this into a drawing instead of, you know, windows, but it is just amazing. Let's see the result of
-
00:28:22 the Qwen Image Edit Model. So this is the Qwen Image Edit Model. It also did a really good job,
-
00:28:28 as you can see. So maybe it's a taste of choice, but probably Gemini is better. Let's see because,
-
00:28:35 you see, for example, in here, these are lamps in the Gemini model, and they are something like
-
00:28:42 this in the Qwen Image Edit Model. Lamps are making more sense. Again, the Gemini result is
-
00:28:48 low resolution and the Qwen Image Edit Model is higher resolution. So therefore, there is
-
00:28:54 a sharpness issue, but this is the comparison. By the way, in this tutorial, you see this one,
-
00:29:00 I have shown how to generate these images one by one with full details. So right away,
-
00:29:06 you can start using the Qwen Image Edit Model as well after watching this tutorial video.
-
00:29:11 Okay, let's do the next case. This is case 26. And let's see the result. Okay, let's see. This
-
00:29:18 is a different output than the Qwen Image Edit Model. Okay, so the left one is the original,
-
00:29:24 the right one is the Qwen Image Edit Model, as you can see. This is upscaled version, and as you can
-
00:29:29 see, it did an excellent job, the Qwen Image Edit Model. Let's see the Gemini. So this is the Gemini
-
00:29:35 version, and yes, the Gemini, for example, ignored the outside, as you can see. There is no outside.
-
00:29:44 The inside, the interior looking pretty good, but this is, you know, like more like a drawing rather
-
00:29:51 than a professional sketch. I don't know, maybe this is not my area, maybe this is more accurate,
-
00:29:58 but let's compare with the result of the Qwen Image Edit, as you can see. So the left one is
-
00:30:03 Qwen Image Edit, the right one is the Gemini. And I don't know which one is better. Let's
-
00:30:09 leave it to the professionals, but both of them is looking just amazing in my opinion.
-
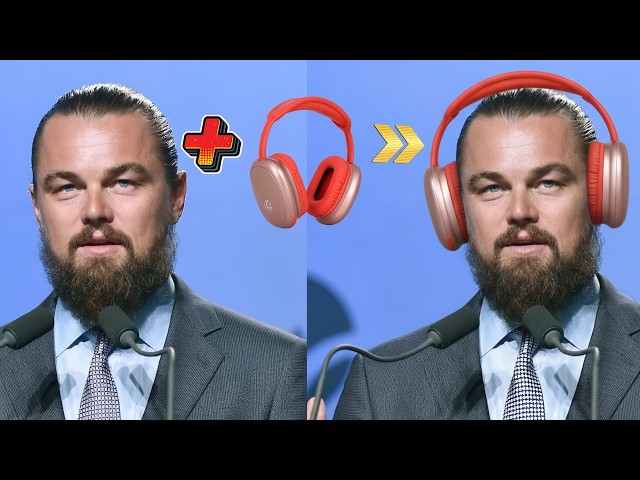
00:30:16 Okay, as a next case, I will try something that the Qwen Image Edit Model fails. So
-
00:30:22 this is test case 27. I will try to make the man wear this earphones. "Make him wear the
-
00:30:32 earphones." So when it comes to combining multiple images, Qwen Image Edit Model is
-
00:30:39 currently not capable of doing that. The authors said that hopefully they will make it. And yes,
-
00:30:47 yes, amazing. So we can see that the Gemini, the Nano Banana is able to process multiple images
-
00:30:57 and amazing. It is working just amazing, looking very accurate. So therefore,
-
00:31:03 this is a clear winner case for Gemini model. When you want to merge multiple images,
-
00:31:09 then this works amazing. Result Gemini. So we don't have a result for the Qwen Image Edit
-
00:31:16 Model because it just fails, but this model is able to, the Gemini is able to do that.
-
00:31:23 Okay, now I will show how you can upscale the Gemini generated images and make them
-
00:31:29 more clear and detailed. To do that, we are going to use SUPIR application. So type into our search
-
00:31:36 bar or check out the description of the video, and you will get these tutorials which you can
-
00:31:41 watch to learn. This is the latest tutorial. I will hopefully make more updated version. So
-
00:31:47 follow this tutorial to see how to install. Let me start the SUPIR application. Let's start with BF16
-
00:31:54 and tiled VAE. Okay, it is fine. Currently, I'm recording this tutorial from my laptop,
-
00:32:01 so the application started in my PC. I started it with Gradio live share so that I can use it from
-
00:32:07 my laptop. Meanwhile, it is running on my PC, or you can use RunPod, Mass Compute. So the interface
-
00:32:13 started. So let's upload one of the images where we need more realism. For example, let's use this
-
00:32:20 lion case because this was lacking details. Let's upscale it into 2x. We also have now max
-
00:32:27 megapixel limits, max resolution limit, whatever you want. So this is going to get into 4 megapixel
-
00:32:33 resolution. I'm also going to use auto LLaVA, but you can use newer models for better prompt
-
00:32:40 generation. This is the easiest way. So this is a quick demo. So let's see the result. I'm also
-
00:32:46 using the default preset. So we have different presets as well, like replicate preset too,
-
00:32:51 if you want. If you want a better prompt than the LLaVA, it is also possible with Google Studio AI.
-
00:32:57 So upload image into Google Studio AI. For this task, we are going to use Gemini Pro. "Generate a
-
00:33:03 prompt in a single line to regenerate this exact image in SDXL," and run. This will give you the
-
00:33:10 most accurate, best prompts that you can use to upscale images with SUPIR application. Okay, it
-
00:33:17 gave this prompt, so I wanted it to make it even more detailed. And this is a more detailed prompt
-
00:33:23 that I can use to upscale with better quality. Okay, so the upscaled image has been generated,
-
00:33:29 let's download it. Meanwhile comparing it, let's use this prompt as well. So this was the LLaVA
-
00:33:35 generated prompt. Let's use this one and let's upscale again. Okay, I saved this image. So let's
-
00:33:41 make another comparison. Let's full screen. So this is the Gemini and this is the Gemini
-
00:33:48 upscaled version. From this to this. You see, the SUPIR upscaled it and made it next level realism.
-
00:33:57 You can see, it added huge amount of details. This is how SUPIR works. So you can use Gemini
-
00:34:04 to edit images, then use SUPIR to upscale images with this quality. This is one click to install,
-
00:34:11 one click to use. Everything is documented in the YouTube tutorial. The link will be in the
-
00:34:16 description of the video for your easiness, but this is the level of quality that you can add.
-
00:34:21 And let's see the upscaled result. By the way, don't forget to uncheck this "Apply LLaVA" if
-
00:34:27 you are typing your own prompt. Otherwise, it will automatically generate a prompt and overwrite your
-
00:34:34 written prompt here. Okay, so new upscale has been completed with our new prompt. Let's download.
-
00:34:40 From 1 megapixel into 4 megapixel, we upscaled. We upscaled each dimension 2x. So let's refresh our
-
00:34:48 slider. Full screen. Okay, original Gemini versus Gemini prompt SUPIR upscale. As you can see,
-
00:34:56 it is looking just amazing. Let's compare it with LLaVA upscale. So left one is LLaVA,
-
00:35:02 right one is Gemini. There isn't much difference for this case. In some cases, it may differ more,
-
00:35:10 but I can say that the Gemini prompt is slightly better than the LLaVA prompt.
-
00:35:16 There isn't too much difference, but if you use Gemini for generating prompt,
-
00:35:21 if you learn how to write as Gemini, you can get better quality for sure.
-
00:35:26 And finally, I am about to finish Qwen Image Lora training. This trainer will support Qwen
-
00:35:33 Image Lora, Qwen Image Edit Model Lora, 1.2 Lora. Let me show you latest interface. So
-
00:35:39 this is the latest interface. When we click open all panels, you will see all of the features that
-
00:35:46 Musubi Tuner supports, plus extra features such as I have added generate from folder structure,
-
00:35:53 dataset toml file. So you will not be spending time to generate dataset tomls yourself. It will
-
00:35:59 do everything automatically. We are adding all of the features, making it super easy. You will
-
00:36:04 be able to click and select the models yourself. It fully supports saving all the configuration,
-
00:36:09 loading all the configuration. I am also adding a lot of information to the screen so that you
-
00:36:15 will know what is doing what, because usually the interfaces, the applications lacking that,
-
00:36:21 but I am adding that. So this will be the ultimate source of training Qwen Image Model or 1.2 model
-
00:36:29 hopefully. It is almost ready. I am doing the test running. I am doing the experimentation. You see
-
00:36:34 the text encoder caching is working. There are some few issues that I am still solving,
-
00:36:39 not ready yet, but almost ready. Moreover, it supports image captioning as well,
-
00:36:45 which is using the Qwen 2.5 VL model. It supports both batch captioning and single image captioning.
-
00:36:52 It supports caption prefix, caption suffix, replace words, so that you will be able to
-
00:36:57 batch caption your images with this model on the same interface without downloading anything
-
00:37:03 or running anything else. It supports both scan sub folders, copy images, and overwrite existing
-
00:37:09 captions as well. So this is a full caption that you can use. It even has default prompt which you
-
00:37:16 can change to generate different captions. This is really good for image captioning.
-
00:37:22 Moreover, we have ultimate image process application. This is also recently upgraded. I
-
00:37:28 have upgraded its segment anything to based auto cropping as well. So this is the ultimate image
-
00:37:35 preprocessing application that you need to select any class from these class list or type anything
-
00:37:43 to focus on that, crop it with the desired aspect ratio, then use image resizer to resize them
-
00:37:50 exactly, exact resolution. Let me show you what it means. For example, I resized my dataset recently
-
00:37:58 for Qwen Image Editing, which is 1328 pixels. So these were my raw images. So copy them and paste
-
00:38:06 them as an input folder. So type output folder like "cropped", then type the aspect ratio. It
-
00:38:12 is one to one. You can also type exact resolution like 1328 to 1328, but this will not make it 1328.
-
00:38:21 This will just try to match that aspect ratio. You can also save the masks like this, "masks",
-
00:38:28 and I used the person in this prompt, and you can uncheck this if your images have transparent
-
00:38:35 pixels. If not, you can keep it as PNG. Then just start processing, and it will start cropping them.
-
00:38:42 This is the way of giving folders. Then in the image resizer, you need to give this folder and
-
00:38:47 in the sub folder, you need to have a folder like this, 1328 to 1328, and the output, let's say,
-
00:38:56 resized. So when you give the setup like this, it will look for the sub folders, it will look
-
00:39:02 for this sub folder, and it will resize, exactly resize them into this with cropping if necessary.
-
00:39:08 So the image cropper doesn't crop your subject, person, and try to match exactly that aspect
-
00:39:15 ratio. So this is basically zooming in. And this is resizing with if it is necessary to crop. So
-
00:39:22 there will be a link in the description that you will be able to download all these images and see
-
00:39:27 the prompts, see the demo images. These results, the results of the Qwen images have metadata,
-
00:39:33 so you can drag and drop them into SwarmUI and directly see how they were generated with prompt,
-
00:39:39 seed, and everything. Hopefully see you in future amazing tutorial video.