Generate Text Arts and Fantastic Logos By Using ControlNet Stable Diffusion Web UI For Free Tutorial
Full tutorial link > https://www.youtube.com/watch?v=C_mJI4U23nQ


Discord : https://bit.ly/SECoursesDiscord. How to use #ControlNet to generate cinematic text arts and logos for free. If I have been of assistance to you and you would like to show your support for my work, please consider becoming a patron on 🥰 https://www.patreon.com/SECourses
Playlist of #StableDiffusion Tutorials, #Automatic1111 and Google Colab Guides, DreamBooth, Textual Inversion / Embedding, LoRA, AI Upscaling, Pix2Pix, Img2Img:
https://www.youtube.com/playlist?list=PL_pbwdIyffsmclLl0O144nQRnezKlNdx3
Easiest Way to Install & Run Stable Diffusion Web UI on PC by Using Open Source Automatic Installer:
How to use Stable Diffusion V2.1 and Different Models in the Web UI - SD 1.5 vs 2.1 vs Anything V3:
Sketches into Epic Art with 1 Click: A Guide to Stable Diffusion ControlNet in Automatic1111 Web UI:
New Style Transfer Extension, ControlNet of Automatic1111 Stable Diffusion T2I-Adapter Color Control:
Free photoshop like website: https://www.photopea.com/
AI Upscalers dataset: https://upscale.wiki/wiki/Model_Database
Prompts (used model deliberate):
3d burning lava fire text
3D cinematic lightning blue shiny diamond text
3D cinematic lightning shiny metallic text
3D cinematic lightning amazing texture having text
3D cinematic lightning shiny metallic text
3D cinematic lightning shiny neon text
00:00:00 How to generate cinematic text for free
00:00:50 How to update Automatic1111 Web UI extensions
00:01:05 How to enable Multi ControlNet and how to speed up ControlNet
00:01:40 How to run Automatic1111 Web UI and ControlNet on weak GPU such as 4GB cards
00:01:55 What are the key points of generating beautiful text artworks with ControlNet
00:02:03 How to generate template base text image easily
00:02:34 How to generate clean background having epic text via ControlNet
00:03:28 Which ControlNet models are working best for txt2img tab cinematic text artwork generation
00:04:44 Second part - How to use img2img tab when generating epic text
00:05:22 Best ControlNet models when using img2img tab
00:06:11 How to generate epic logo by using Stable Diffusion Web UI ControlNet
00:08:20 Few of the best AI upscalers examples comparison
00:09:14 Where to download and how to use different AI upscales for free
00:09:45 Dramatic different effect of using higher target resolution
Generating cinematic text is a great way to enhance the visual appeal of any artwork or video project. With the help of Artificial Intelligence (AI), it is now possible to generate stunning text effects quickly and easily. In this article, we will cover everything you need to know about generating cinematic text with ControlNet, a state-of-the-art AI text generator, and how to use it for free.
Generating Cinematic Text for Free
ControlNet is a powerful AI-based text generator that can be used to generate cinematic text for free. The best part about using ControlNet is that you do not need any special skills or knowledge to use it. All you need is an internet connection, and you can access ControlNet through a web browser.
Updating Automatic1111 Web UI Extensions
Before you start using ControlNet, it is essential to update Automatic1111 Web UI extensions. This will ensure that you have access to all the latest features and improvements, making your experience with ControlNet more seamless.
Enabling Multi ControlNet and Speeding Up ControlNet
Enabling Multi ControlNet and speeding up ControlNet can significantly improve the speed and efficiency of generating cinematic text. Multi ControlNet allows you to use multiple GPUs simultaneously, increasing the speed of the text generation process. Additionally, optimizing the ControlNet settings can speed up the process even further.
Running Automatic1111 Web UI and ControlNet on Weak GPU
If you have a weak GPU, such as a 4GB card, you can still run Automatic1111 Web UI and ControlNet. However, it is recommended that you optimize the ControlNet settings to ensure that the process runs smoothly.
Key Points for Generating Beautiful Text Artworks with ControlNet
Generating beautiful text artworks with ControlNet is relatively simple. The key is to start with a high-quality template base text image and then generate a clean background with epic text using ControlNet. Additionally, using the right ControlNet models can significantly improve the quality of the generated text.
Generating Template-Based Text Image Easily
To generate a template-based text image, you first need to select a high-quality image and add text to it using a tool such as Adobe Photoshop. Once you have your template image, you can use ControlNet to generate additional text effects.
Generating Clean Background with Epic Text via ControlNet
Generating a clean background with epic text via ControlNet is a straightforward process. First, you need to select a background image and then use ControlNet to generate text effects on top of it.
-
00:00:00 Greetings everyone.
-
00:00:01 In this video, I will show you how you can generate epic text by using ControlNet.
-
00:00:07 There are several key issues when using ControlNet to generate text or logos for your companies,
-
00:00:14 for your job, for your professional business, and I will explain all of them.
-
00:00:18 In this video, I will not show how to install ControlNet or Automatic1111 Web UI because
-
00:00:23 I already have excellent tutorials for these.
-
00:00:27 For example, in this tutorial, I have explained how to install and run Automatic1111 Web UI.
-
00:00:33 In this tutorial, I have explained how to install and use ControlNet.
-
00:00:38 And this is my newest tutorial where I explained how to install and use ControlNet from scratch.
-
00:00:44 The only thing that I want to mention is that currently, extension update mechanism of the
-
00:00:49 Automatic1111 Web UI is broken.
-
00:00:51 Therefore, update your extension through git pull.
-
00:00:55 So enter inside the folder of your extension, then type git pull.
-
00:00:59 That's it.
-
00:01:00 So to achieve good high quality text, we are going to use Multi ControlNet.
-
00:01:05 To enable Multi ControlNet, go to the Settings tab in your Automatic1111 Web UI.
-
00:01:10 Go to the ControlNet tab in here.
-
00:01:12 Set Multi ControlNet max models amount like 4. And model cache size.
-
00:01:18 This model cache size will speed up your image generation whenever you generate new images.
-
00:01:24 This is really really important.
-
00:01:25 If you set this one and if you use 2 ControlNet, each time it will load models.
-
00:01:30 Therefore, it will slow you down significantly.
-
00:01:33 However, if you get out of memory error, of course, you need to reduce this to 1.
-
00:01:37 And one final thing, if you are still getting out of memory error, start your Automatic1111
-
00:01:43 Web UI with –medvram command line argument.
-
00:01:46 This will significantly lower the required VRAM amount.
-
00:01:50 However, it will slow you down significantly as well.
-
00:01:53 So what is the key point of generating epic text with ControlNet?
-
00:01:57 First of all, you need to generate your text template, the base image.
-
00:02:02 For this, I have used photopea.com.
-
00:02:04 This is a free Photoshop like service that you can use.
-
00:02:07 So I have generated a very simple image like this.
-
00:02:10 White background and over it, I have a black text.
-
00:02:13 Once you generated it, just click Export as PNG.
-
00:02:16 Then in our Web UI, go to the Text to Image tab, define your prompt.
-
00:02:21 This is really important because what you are going to get will be 100% based on your
-
00:02:26 prompt and the base model that you are using.
-
00:02:29 So if you use Text to Image tab, you are going to get clean background having text like this.
-
00:02:34 As you can see, this is a pretty simple prompt and this is the output of it.
-
00:02:38 So in the bottom, you will see ControlNet in here.
-
00:02:41 As a control model 0, load the image from here.
-
00:02:45 Let me demonstrate it again like this.
-
00:02:47 And as a preprocessor, I am picking the first preprocessor as Canny and I am selecting the
-
00:02:52 model as Canny from here.
-
00:02:54 Click Enable.
-
00:02:55 Annotator resolution is also important.
-
00:02:57 If your input image is over 512, then you should also increase this resolution according
-
00:03:04 to that.
-
00:03:05 And when you click Preview Annotator Result, it will display you this Annotator Result here.
-
00:03:09 So you can see how it is affecting.
-
00:03:12 And if you get out of memory error, you can check this low VRAM. In the control model 1.
-
00:03:17 Because we are going to use two control models to achieve this high success rate.
-
00:03:22 Again, we are uploading our same base image.
-
00:03:25 Then for this one, I am selecting Scribble.
-
00:03:28 When you are using Text-to-Image tab to generate such text images, Scribble and plus Canny
-
00:03:34 is working best.
-
00:03:35 So select your preprocessor as Scribble.
-
00:03:38 Select your model as Scribble.
-
00:03:40 Make sure that you have right Annotator Resolution.
-
00:03:43 You can also click Preview Annotator Result to see the preview and you are ready.
-
00:03:47 Then just hit Generate button and you will get the images that you want to and then you
-
00:03:53 will start getting images.
-
00:03:54 Of course, as in the nature of Stable Diffusion, you have to generate hundreds of images or
-
00:03:59 try different prompts to get what you want.
-
00:04:01 For example, I have changed blue to gold and these are the results I got.
-
00:04:06 These are not cherry-picked.
-
00:04:07 These are the first results I have got.
-
00:04:10 You see, with just changing prompts, you can get awesome different results and you may
-
00:04:15 get the best one you are looking for.
-
00:04:17 And these are the maps used.
-
00:04:19 Using two ControlNets is the key here.
-
00:04:22 Otherwise, you are not going to get this quality of text.
-
00:04:25 And the very nice thing of this is that you can use any resolution.
-
00:04:30 So if you make your base image 1024, just change the output to 1024 and you are going
-
00:04:35 to get awesome 1024 images.
-
00:04:38 Also, you can play with CFG value to see what kind of results you are getting.
-
00:04:42 Now the second part.
-
00:04:44 First, generate your background image with a certain prompt you like.
-
00:04:48 For example, I have generated this image by using epic cinematic blue, space station,
-
00:04:53 masterpiece, art station.
-
00:04:55 This time we are going to use image to image tab.
-
00:04:57 This is important.
-
00:04:59 Upload your base image.
-
00:05:00 So here my base image, just drag and drop.
-
00:05:02 Then set your denoising strength.
-
00:05:05 This is really important.
-
00:05:06 This is actually the most important thing that will determine your output.
-
00:05:10 If you increase this too much, then you are going to get a very different background.
-
00:05:14 It will completely become almost the text.
-
00:05:17 If you make this very low, then you are not going to get good text.
-
00:05:21 I will demonstrate that.
-
00:05:22 And this time we are going to use again, canny preprocessor and canny model in the first control
-
00:05:28 net model.
-
00:05:29 But in the second control net model, this time we are going to use hed preprocessor
-
00:05:33 and hed model.
-
00:05:34 This is working better than scribble when you are generating your text over an image.
-
00:05:40 When you are using image to image tab.
-
00:05:42 This is really important.
-
00:05:44 So for example, let's use the same seed and change the denoising strength to see what
-
00:05:49 kind of effect we are going to get.
-
00:05:51 Okay, on the left we see 65% denoising strength and on the right we see 90%.
-
00:05:57 So when you increase your denoising strength, then the parts where your map is applied becomes
-
00:06:04 much more simpler.
-
00:06:06 Like in the first case, because our map is overriding the original image.
-
00:06:11 And as a third, I will show you how you can generate fantastic logos by using the same
-
00:06:17 principle.
-
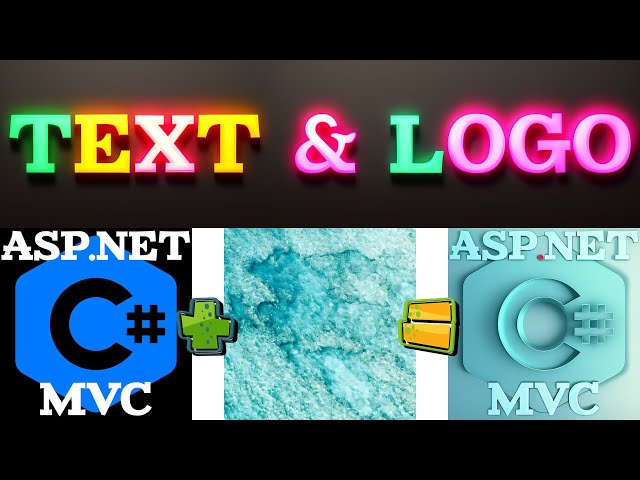
00:06:18 For example, this is the base logo of C sharp.
-
00:06:21 I have downloaded this, added a black background to it.
-
00:06:25 Then I have used photo P to write a simple text on it like this.
-
00:06:31 Then again, in image to image tab, I have used a base image like this.
-
00:06:35 This is the prompt that I have used to generate this base image.
-
00:06:38 And in the bottom I have uploaded my target image.
-
00:06:41 Then I have chosen preprocessor as canny model as canny.
-
00:06:45 I did set my annotator resolution same as my input image.
-
00:06:49 And again, I am using hed model as hed and the annotator resolution is set like this.
-
00:06:53 Then this time I have used 75 denoising strength.
-
00:06:57 And for example, this is one of the images I have got.
-
00:07:00 So it is trying to use the colors context in here and generating the output image in
-
00:07:07 here.
-
00:07:08 By using this strategy, you can turn any logo into an epic artwork.
-
00:07:13 For example, I have generated the thumbnail image of our discord server channel by using
-
00:07:18 this same strategy.
-
00:07:20 You see it is keeping the C sharp logo as in here.
-
00:07:23 But it is generating a perfect artwork by using our prompt and the control net inputs
-
00:07:30 and the base image to image.
-
00:07:31 By following this strategy, you can generate awesome fantastic images.
-
00:07:36 There are limitless number of things that you can generate.
-
00:07:39 For example, these are the results of another batch generation.
-
00:07:43 These are not cherry-picked.
-
00:07:45 I am able to generate batch size as 8 and cache 3 models on the RAM.
-
00:07:51 And my graphic card is only RTX 3060 which has 12 GB VRAM.
-
00:07:57 So it is working very well.
-
00:07:59 And you see during the batch generation, it was using almost all of them.
-
00:08:02 But I have generated 8 images at once.
-
00:08:05 And these are the results of the generation.
-
00:08:07 All I need to do is generate more images and get the best one that I like.
-
00:08:11 And once you get the image that you are looking for, you can upscale it.
-
00:08:16 For upscaling, I will compare several of them and show you now.
-
00:08:20 To upscale this image, I will click send to extras.
-
00:08:23 Also, you can upload it in here.
-
00:08:25 For example, let me show.
-
00:08:27 Let's upload this one.
-
00:08:28 It is the same principle.
-
00:08:29 And I find that 4X UltraSharp is really good for upscaling images.
-
00:08:34 Okay, this is the upscaled version of the image with 4X UltraSharp.
-
00:08:38 And this is the original image.
-
00:08:40 Let's compare them.
-
00:08:41 Here is the comparison.
-
00:08:42 This is the base image.
-
00:08:43 And this is the upscaled version.
-
00:08:45 Alternatively, of course, you can always generate 1024x1024.
-
00:08:50 That takes more time, but you may get better results.
-
00:08:53 And let me compare it with other upscalers that I have.
-
00:08:57 So these are the upscalers I have tested so far.
-
00:08:59 Let's try with Lollypop.
-
00:09:01 Okay, here we see the result of Lollypop on the right and the 4X UltraSharp on the left.
-
00:09:07 So it is up to you to choose which one that you like.
-
00:09:11 And you may wonder where you can download these models.
-
00:09:14 There is a model database wiki for upscalers.
-
00:09:18 This is a link of it.
-
00:09:19 From here, just download them and put them inside the target folder based on their architecture.
-
00:09:25 For example, you see these are based on ESRGAN.
-
00:09:28 Therefore, you need to put them inside this folder.
-
00:09:32 Inside your Automatic1111 installation, inside StableDiffusion WebUI models, ESRGAN.
-
00:09:36 You see.
-
00:09:38 So when you put them inside here and after you restart your WebUI, you will be able to
-
00:09:43 use these upscaler models.
-
00:09:45 And one other thing is when you change the output resolution bigger than the original
-
00:09:50 resolution, you are going to get a very different image.
-
00:09:54 You see, currently I am using denoising strength as 1.
-
00:09:58 100%.
-
00:09:59 Let's make the width and height the double of the original resolution.
-
00:10:03 1024, 1024.
-
00:10:04 And let's hit generate.
-
00:10:07 And this is the output we get with 1024.
-
00:10:09 It is completely different output.
-
00:10:12 So it is up to you which one you prefer.
-
00:10:15 If you keep the original resolution, you are going to get images like this.
-
00:10:19 But if you prefer a bigger resolution, you are going to get images like this.
-
00:10:23 Actually this one looks fantastic.
-
00:10:25 But it is like only keeping the shallow structure of our input images.
-
00:10:30 So it is 100% stylized.
-
00:10:32 It looks epic, but not as clear as this one.
-
00:10:38 So it is up to you to get whichever you want.
-
00:10:41 This is all for today.
-
00:10:42 Please like, subscribe, join and support us on Patreon if possible.
-
00:10:47 You will see the link of our Discord in the description.
-
00:10:51 Also in the comment section of the video.
-
00:10:53 You will also find our Patreon link there as well.
-
00:10:56 Thank you very much for watching.
-
00:10:57 Leaving a comment, liking, sharing.
-
00:11:00 Hopefully see you in another awesome video.